If you're familiar with shooting in manual mode, most of this will be a breeze! Like all other photography, you're chasing light. With night photography, available light is often severely limited, so you've got to find acceptable defects in your photos. By that, I mean you have to deal with noise grain, shallow depth of field, motion blur and unbalanced light as you adjust shutter, aperture, ISO, and fill lights. That's the exposure triangle with an added angle!
To get more light, you have four options:
- Longer shutter. Long exposures will give you more light over time, but any motion will eventually smear, including the stars, so you'll need to learn the "Rule of 500" to determine the maximum exposure for your lens and camera. Longer exposure will also increase any light pollution present in the scene. Bright lights will "bloom" the longer you expose them.
- Wider Aperture. Wider aperture allows more light in, but at f/2.8 or wider, it decreases your depth of field dramatically. This is a physical limitation of the lens design, so you may need to purchase a new lens at some point. You will need to shoot hyperfocal distances. That usually means distancing yourself from the foreground. DOF Master is a good resource and they have an app for Android and iOS for field reference.
- Higher ISO. Higher ISO effectively increases sensor sensitivity, but will also add various types of noise to your image. (That's a topic for another post!) At some point, you will have too much noise for your software to correct. The low light ability is built-in to your camera's sensor and electronics, so when you reach the limit, you'll need to upgrade.
- Add light. You can also add light to the foreground, but you must balance the light with the sky background. This really limits the amount of light you can add. Most of the time, I'm light painting with very dim lights or flash set at its lowest setting. In the final image of this post, I had two small LED lights with receipts taped over the face to reduce the light. The two outside lights were set at lowest settings and set back 100 and 150 yards to keep from burning out the foreground.
Equipment
Mandatory:
- Camera with long shutter 15-30 seconds and high ISO 800-3200
- wide angle lens (11-35mm) & wide aperture (f/2.8 or lower recommended)
- Sturdy Tripod
- Remote release (Wired release strongly preferred)
- Patience and a sense of humor! (You're gonna need it at first!)
- Headlamp or flashlight (red light preferred to preserve night vision)
Optional Equipment:
- Very bright spotlight or flashlight (optional - light painting, focusing)
- Variable video lights (lighting foreground, light painting)
- A small folding stool or chair to make it easier on the knees.
- Glow sticks, battery string lights, laser pointers, other lights for light painting
Camera Notes:
You can shoot night shots with any camera and lens that will do exposures longer than 15 seconds and a lens that can open to f/3.5, but you will have better results with better equipment. I started shooting night shots with a very low-end Nikon D40 and the 18-55 f/3.5 lens. It worked well for twilight and urban night shots, but performance fell off quickly when I tried starry landscapes. I moved up to the D5100 and D5300 since that line was known for good night performance at a low price.
I recommend a DSLR or mirrorless camera known for low noise at higher ISOs and a fast wide lens (f/1.8 to f/2.8 and 18-35mm) to capture the most light in the least amount of time. Generally, a full frame camera will out-perform a crop frame camera of the same generation, but some compact, mirrorless, and micro 2/3rds cameras have excellent high ISO performance.
Prepare at home
You must be familiar with basic manual settings to avoid frustration in the dark. If not, your manual, Google, or other photographers will show you the way!
Lens settings
- Manual focus & aperture for your lens/camera
- Vibration reduction off (name varies, but this is the anti-shake mechanism. Not all lenses have it.)
Camera
- Manual mode
- ISO
- Shutter about at 10-15 seconds
- Aperture to lowest number (or a step or two smaller)
- Mirror lock/Shutter delay - optional
- LCD brightness (optional, but highly recommended so you keep your eyes dark-adapted)
- White balance to daylight (for easier post processing)
- Flash off! (Seriously, flashes hurt when you don't expect it!)
- Set to RAW for best dynamic range
- High ISO noise reduction off (optional)
- Enable I/R remote shutter (if you're using one.)
Practice!
You will need to familiarize yourself with the location and methods to change the following settings IN THE DARK! It will help you if you can go to a dark room and make these changes. You'll save yourself loads and loads of frustration with a little practice:
- ISO - 800 to 3200, start at 1600
- Aperture - widest possible (lowest number) f/2.8 or lower recommended
- Shutter speed - 15-30 seconds, start at 20 seconds.
- Live view (if available to aid in focusing)
- Enable I/R remote release (if you're using one.)
- Flash off
Tricks of Night Shooting
Night shooting is all about gathering light, but it does have its challenges. Here are a few of the tricks I've learned to overcome them:
- Vibration is the enemy - To keep your camera still:
- Use a sturdy tripod and add weight to hold it down. Good tripods have a "pack hook" on the bottom of the center column just for this purpose. You can use ankle weights around the top of the legs.
- Use a remote release - Pressing the button will add vibration!
- Remove or tie down straps to avoid them blowing in the wind.
- I/R wireless remotes (cheap clicker remotes with an LED in the front) will show up in your photos. If this is all you have, you might want to fasten a small mirror, metal foil, or other reflective surface to the front of your camera so that light reflects to the sensor instead of trying to avoid the field of view and hit it from the front.
- Focus is the single most difficult thing to accomplish at night. Your camera won't autofocus unless you have bright lights. You won't be able to judge focus through the finder.
- Use a laser with a "holographic projector" (a twisting lens that shows dots and squares of light) or a bright flashlight to give your camera enough light to focus automatically, then switch to manual to preserve that setting.
- Find a distant security light, antenna tower, or bright planet, turn on live view and zoom in with your buttons to 1:1. Focus manually until you see fine details (small stars, antenna structure, buildings, etc.) pop into view. Beware - The focus range will often be very small with large aperture settings!
- If you have a digital (auto focusing) lens, you probably want to tape down focus once you verify you're in focus. These lenses are made to move quickly with small motors embedded in the body. They easily vibrate or slip out of focus. I use gaffer's tape (similar to duck tape, but with lower/no residue) to tape the focus ring down tight.
- Be sure to verify both foreground and stars are in focus by zooming in on your photos as you shoot. I can't tell you the number of times I've lost hours of work because the stars or foreground was fuzzy.
- Dress for weather at least 10 degrees cooler than actual air temp. You'll spend lots of time standing still, so your body won't stay as warm as it does when walking. Be sure to wear warm shoes/boots and gloves in the cold as these are the first to really feel it.
- Learn about hyperfocal focusing. There should be a point where you have both foreground and stars in focus, but that will often force you to step back at large apertures.
How do I start?
The easiest way to start shooting night landscapes is to start with more light and work darker and darker as you get comfortable with the process. I got started shooting sunsets and sticking around for an hour through twilight and on into night. I would recommend that you do the same. Pick a sunset with fairly clear skies and a rising moon, start shooting the sunset, switch to manual focus, then through twilight (every 10-15 minutes) until full dark. Chase the settings as the lighting changes.
Early Twilight shots
After shooting a sunset, wait for the sky to darken and the blue to fade. When the bright stars or planets first appear, try a photo. Adjust the settings so you get the stars in the sky, any lights on the ground, and, if the light allows, foreground details. Keep trying shots every 10 minutes, remembering to change the settings as the light changes. Note carefully changes in light and shadows, colors, and details as twilight progresses. Repeat this process until you understand how the light changes from sunset to twilight to night.
The sky in the shot below was navy blue to the naked eye, with an orange-red glow on the horizon bright enough to reflect off the water. The long exposure enhances the sky colors, but wiped out most of the color in the sunset embers. For this stage, that's OK.

(Nikon D5100, 18-55mm VR, 18mm, f/3.5, 10 seconds, ISO 800)
Urban Night
Shooting at night under city lights is pretty easy. You should be able to focus on your subject and even cell phones do pretty well under the streetlights. You can practice long exposures and get some pleasing motion blur photos:

(Nikon D5100, 55-200mm VR, 200mm, f/3.5, 10 seconds, ISO 200)
Lit buildings like the Wallace Theater below is another good option:
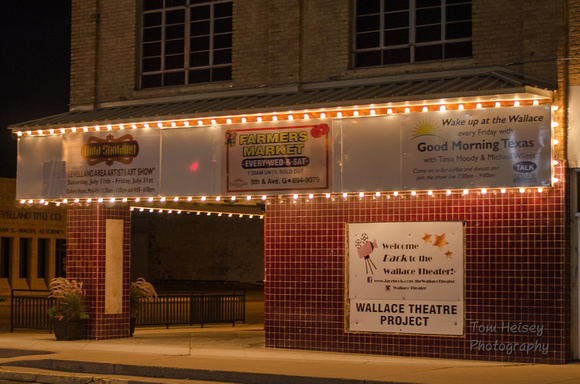
(D5100, 50mm, f/1.8, 1/10 second, ISO 200, hand held)
Deep Twilight:
The sky in this photo appeared black, even with Venus setting. The glow on the horizon had lost all color and was fading. A long exposure brought out colors and the sky's blue was brought out by the Moon, which is out of frame to the upper left.

(Nikon D5300, Samyang 14mm, f/2.8, 20 seconds, ISO 1600)
Moonlit Night
Having the moon up will reduce the number of stars, but it will give you a gorgeous blue sky and light the ground. It's also easier to work and walk in moonlight. I've gotten best results with the moon at 20 to 40 degrees above the horizon, which limits the moonlight and gives you nice shadow definition as well.

Nikon D5100, Samyang 14mm, f/2.8, 20 seconds, ISO 1600
Deep, dark night
By now, you're comfortable working with your camera at night, so it's time to go dark! You'll need to rely on your flashlight to move around, but keep it off while shooting unless you're light painting. (That's a subject for another post.) You should pick a nice, dark site where you can clearly see the Milky Way. With some experimentation, you can get a shot like this:
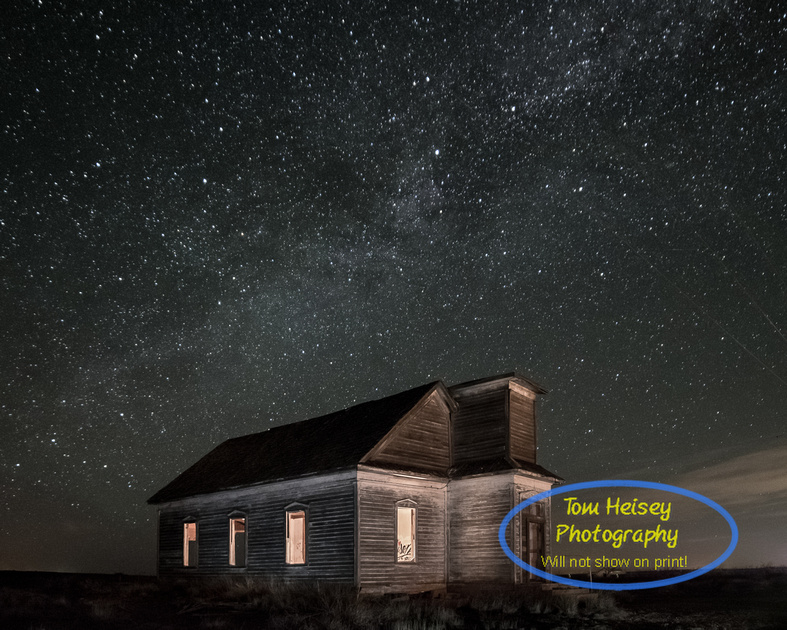
I have often wondered what stories the walls of abandoned buildings could tell as I sit there taking my long-exposure photos. As a photographer, reaching people and bringing back memories is a special achievement. It makes me very happy to know that I've honored the memories of the people who lived, loved, and worshiped in a building that formed the center of a community as this church did for Taiban.
I love taking photos in the dark, using lights to create light where none has existed for years or decades. For me, it's a peaceful, yet exciting, experience to sit out beside a dark building, listening to coyotes and night birds, while I create images of times long past. At times, I can almost see the people going about their lives in and around these abandoned buildings. When I hear from those who did spend time there, it makes the photo all the more special!
]]>
The original Iridium satellites have a fixed panel and orientation that causes sunlight to reflect down on Earth a bright, predictable path. Wikimedia has an excellent animated gif showing the reflection pattern. At the center of the path, these flares could be bright enough to cast a shadow at night, so they could be a stunning sight! There were more than 60 first generation Iridiums in orbit, so you could possibly see 4-5 flares per week. As the 1st generation satellites age, the company has been slowly replacing them with newer equipment that does not flare.
There are only a few of the old satellites left and when I found that #54 was still in service and was going to pass fairly near home, I started looking for foreground objects to create a stunning scene worthy to bid these satellites farewell. I have always been interested in abandoned buildings, especially buildings that saw lots of life - I always wonder what stories the walls could tell if they could talk! Churches, town halls, ranch houses, gins, stores, and family cabins all draw me in.
Fortunately for me, the path went very near the Taiban Presbyterian Church! I've passed by the church on a number of drives and many of my friends have shot the church, but this would be my first chance to shoot it. Of course, I wanted to bring all of my expertise to create that unique, gripping shot, so I used four small LED lights to show the interior and exterior of the church while balancing that light with the Milky Way and night sky.
I am rather pleased with the results:

As with most of my shots, this is a single exposure. There are other ways to capture a night scene, but by far, my strong preference is to shoot it in camera and minimize the need for post-processing. It took some 30 minutes of experimentation to get the lighting where I wanted it, with two external LED lights 50 to 75 yards to the right of the camera and two small LED lights inside to light the interior.
Nikon D5300, Samyang 14mm, f/2.8, 30 seconds, ISO 1600, levels and adjustments in Lightroom.
The timing of the last pass was nice, as it was during a new Moon. Better yet, the Milky Way and Jupiter would be in view! Then to my confusion, another satellite passed on the Iridium's predicted path, but in the opposite direction and the Iridium was shifted west (right). Fortunately, the flare just made it into the shot!
As an added bonus, the skies were dark enough that fine details in the Milky Way are clearly visible. The bright disk just above the Milky Way is Jupiter. If you look carefully behind Jupiter, you can see the shadowy figure of a horse, with his backbone vertical and nose up. This is the Dark Horse (or Prancing Horse) Nebula, which is several clouds of dust and gas that block the light of stars behind. If you look at the horse's hindquarters, you'll see this set of nebulae as the Peace Pipe Nebula, with the body and forequarters as smoke from the pipe. The horse or peace pipe is actually a naked eye object from very dark sites, so see if you can spot it in the coming summer evenings when you're out well away from the city!
If you continue down from bright Jupiter to just above the front corner of the church, you see one of my favorite objects - the Ptolemy's Cluster, which is a snowflake-shaped open cluster of bright stars that are a gorgeous sight in binoculars and telescopes. Just above that bright knot of stars is a much larger bright region, the Large Sagittarius Star Cloud that is often called the "steam" that rises out of the asterism "The Teapot." Most of the teapot is behind the church. Not far above "The Steam" is a small slightly red bright knot known as M-8 the Lagoon Nebula. It's a beautiful little star-forming nebula and star cluster that looks quite nice in a telescope.
Travelling up the Milky Way, the large, white patch of stars is known as M-24, the small Sagittarius Star Cloud. The dark area above that is known as the Great Rift, where dust obscures the stars and appears to split the Milky Way in two. It's the culmination of a split that originates well below the horizon in this view.
As you can tell, I love to watch the night sky and the howl of coyotes is music to my ears! I hope you enjoyed a small tour around my world!
]]>
One of the shots I’ve tried perfecting over the years is a shot with stars over a storm on the plains. This is a challenge to get in the right place at the right time and has mostly eluded me over the last two years. This shot is of a very large thunderstorm complex over 60 miles away with the Milky Way overhead.
If you look carefully at center, you can see the shape of a “shadow horse” (tail down, legs to the right), known as the Prancing Pony or Prancing Horse. The hind quarters form the “peace pipe” with the upper body and forelegs forming smoke from the pipe, which is darker and more visible than the rest of the Prancing Horse. You know you’re in a very dark site when you can see it with the naked eye!
]]>When I got into astronomy around 2000, I started taking night, wildlife, and low light photos. My day job is computer and technology support at Texas Tech University, but I spend most of my weekends out under the stars enjoying the glorious skies of west Texas. I now share this passion with students of South Plains College Extended Education Photography, which has helped me learn more about the craft!
]]>